The First 48 Hours at Home: A Gentle Guide to Your New Beginning
You’ve just pulled into your driveway. You are back from the hospital. For the last week or two, you’ve been surrounded by doctors, blinking monitors, and nurses who changed your stoma bag with practiced, effortless ease. But now, you are standing in your own hallway. The front door is closed. The “hospital bubble” has burst.
Suddenly, your own bathroom feels very different.
It is completely normal if your hands are shaking a little right now. Walking through your front door after ostomy surgery is a deeply emotional milestone. It’s the moment the reality hits you: This is my new normal. You might feel incredibly grateful to be alive, but terrified of the next time your bag fills up.
Please take a breath. Look at yourself in the mirror and give your body some grace. You have been through a major battlefield, and you are still standing. You can do this. Let’s walk through your first 48 hours at home together, step by step.
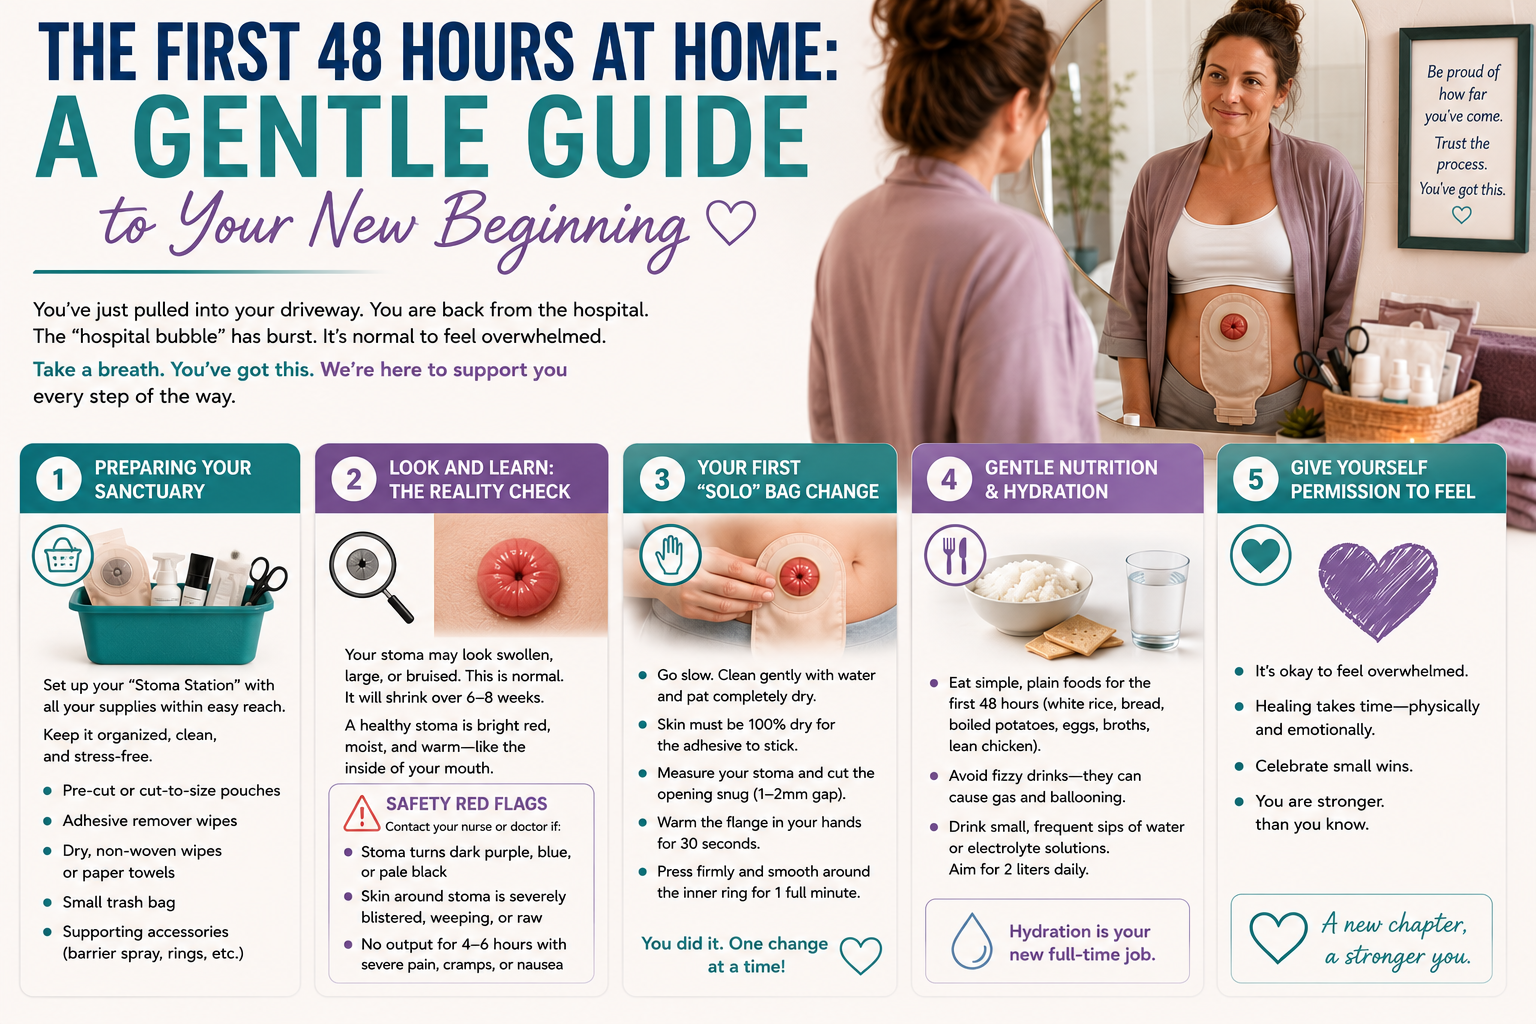
Preparing Your Sanctuary
Before you even think about changing your appliance, you need to set up your environment. In the hospital, everything was handed to you on a clean plastic tray. At home, confusion breeds panic. If you experience a leak at 2 AM, the last thing you want to do is hunt through random cupboards for a pair of scissors.
Turn your bathroom into a stress-free zone. Clear off a specific shelf or place a clean, dedicated basket next to the sink. This is your “Stoma Station.”
Pack it with your daily essentials:
- Your pre-cut or cut-to-size pouches.
- Medical adhesive remover wipes (to pull the bag off gently).
- Dry, non-woven wipes or basic paper towels (standard toilet paper shreds too easily when wet).
- A small trash bag for disposal.
- Your supporting accessories (like barrier sprays or moldable rings).
Look and Learn: The Reality Check
When you sit down to do your first bag change at home, you are going to look directly at your stoma. It might look different than it did a few days ago.
Right now, your stoma is likely still swollen from the trauma of surgery. It might look quite large, bruised, or a bit prominent. That is completely okay. Over the next six to eight weeks, that swelling will steadily go down, and your stoma will shrink into its permanent size.
Remember what we talked about in the hospital: a healthy stoma should look bright red, moist, and warm. It looks like the inside of your mouth. It has no nerve endings, so when you touch it to clean it, it will not hurt. You might see a tiny speck of blood on your wipe when cleaning it—don’t panic. The tissue is delicate, like gums when you floss.
The Safety Red Flags
While change is normal, look out for these three signs. Contact your stoma nurse or doctor immediately if:
- Your stoma turns a dark purple, blue, or pale black color (this means the blood supply is compromised).
- The skin around the stoma becomes severely blistered, weeping, or raw.
- You have absolutely no output for more than 4 to 6 hours, accompanied by severe abdominal pain, cramps, or nausea (this points to a food blockage).
Your First “Solo” Bag Change
The house is quiet. It’s time to change the bag by yourself for the first time.
First, gather your thoughts. If your stoma is highly active, try to time your change for first thing in the morning before you eat or drink anything, as this is when the bowel is usually sleepiest.
Take your time. Peel the old pouch off slowly from top to bottom while pressing down gently on the surrounding skin with your other hand. Clean the area with plain water.
Now, here is the golden rule of stoma care: Skin health is entirely dependent on dryness. If your skin is even slightly damp when you apply the new baseplate, the adhesive will fail, output will leak, and your skin will burn. Pat the area completely dry with a paper towel.
Because your stoma is still changing shape, use your measuring guide card to check the size before you cut the baseplate hole. It should fit snugly around the base of the stoma like a collar, leaving no more than a 1–2mm gap of exposed skin.
Before you press it to your body, warm the sticky flange between your hands for 30 seconds. Your body heat activates the medical adhesive, ensuring a bulletproof seal. Press it down firmly, smoothing your fingers around the inner ring for a full minute.
You did it. Your first solo change is complete.
Gentle Nutrition for the First Days
Your digestive tract has been rearranged and handled by a surgeon. It needs a soft, easy landing.
For these first 48 hours at home, keep your meals plain and boring. Think of it as a “white palette” diet. Stick to white bread, plain white rice, boiled potatoes, soft eggs, clear broths, and lean chicken. Avoid carbonated fizzy drinks, which will instantly inflate your bag with gas like a balloon.
Hydration is your new full-time job. When you lose a portion of your bowel, your body processes water differently. Drink small, frequent sips of water or electrolyte solutions throughout the day. Aim for 2 liters. Don’t chug large glasses of water all at once, as this can actually flush through your system too quickly and cause dehydration.
Give Yourself Permission to Feel
Lastly, remember to look after your heart.
You might look at your reflection today and cry. You might feel a profound sense of grief for the body you had before surgery. That is not weakness; it is human. It takes time for your mind to catch up with the physical changes your body has endured.
Celebrate the small victories. Did you empty the bag on your own today? That is a win. Did you look at the stoma without turning away? That is progress.
You are going to get through this transition. Step by step, change by change, your confidence will return. And remember, you don’t have to walk this road in isolation.
Need a Helping Hand?
If you are feeling unsure about your stoma size, if your skin is starting to sting, or if you simply want a professional to verify that your appliance fits perfectly, we are here for you.
At StomaCare Supplies, we ship discreet care packages nationwide and offer private virtual consultations. Click the button below to download our Free toma Safe Food Guide , or send our team a WhatsApp message right now. We will guide you through every single step.